这几天使用 Github 编译、打包支持写入斐讯 N1 eMMC 的 OpenWRT 固件,顺便把之前编译失败(rust 错误、空间不足)的玩客云也折腾了一下。
备用节点:大哥云、万城v-city、飞机云、搬瓦工JMS、极客云、魔戒……
玩客云硬件参数
CPU 为晶晨 S805 ,32 位,ARM 4 核 1.5GHz;1G(DDR3) + 8G(eMMC)
两个 USB 2.0,一个 HDMI 接口,一个千兆网口(RJ45)
咸鱼二手价格很便宜,替代 N1 当旁路由也不错。
前情回顾
2024 年 10 月编译的玩客云 OpenWRT eMMC 直刷固件其实是成功了的,只是进错了后台地址,以为编译的时候哪里没有配置好……
Github Actions 云编译 OpenWRT-玩客云 usb 直刷 eMMC 固件
简单记录一下折腾记录。还是极简编译,主要是酸酸乳插件。
还是使用 P3TERX 大神的 Actions-OpenWrt(GitHub Actions)+ Lean's LEDE 进行云编译。
玩客云固件打包参考资料:xydche - 玩客云 openwrt 自动编译
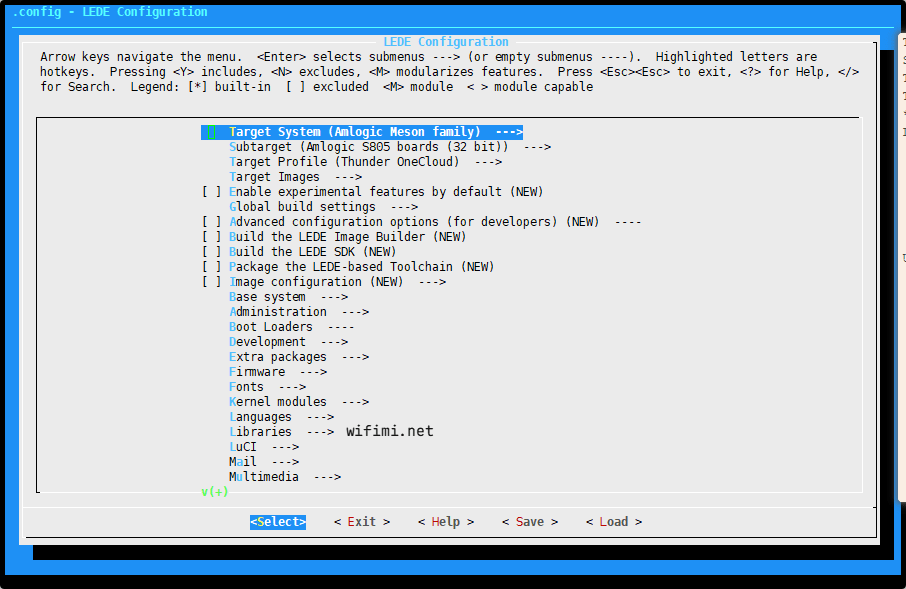
编译硬件平台选择
Target System:Amlogic Meson family
Subtarget:Amlogic S805 boards (32 bit)
Target Profile:Thunder OneCloud
编译配置
1 、参考 https://github.com/unifreq/openwrt_packit 选择 eMMC 相关软件包、依赖:
Target System  ->  Amlogic Meson family
Subtarget ->  Amlogic S905x boards (64 bit)
Target Profile  ->  Phicomm N1
Target Images  ->   tar.gz
*** 必选软件包 (基础依赖包,仅保证打出的包可以写入 EMMC, 可以在 EMMC 上在线升级,不包含具体的应用):
Languages -> Perl
             ->  perl-http-date
             ->  perlbase-file
             ->  perlbase-getopt
             ->  perlbase-time
             ->  perlbase-unicode
             ->  perlbase-utf8
Utilities -> Disc -> blkid 、 fdisk 、 lsblk 、 parted
          -> Filesystem -> attr 、 btrfs-progs(Build with zstd support) 、 chattr 、 dosfstools 、
                           e2fsprogs 、 f2fs-tools 、 f2fsck 、 lsattr 、 mkf2fs 、 xfs-fsck 、 xfs-mkfs
          -> Compression -> bsdtar 或 p7zip(非官方源) 、 pigz
          -> Shells  ->  bash
          -> gawk 、 getopt 、 losetup 、 tar 、 uuidgen

 * 光影猫 (Photonicat) 依赖包:
     *  (必选, required,如果不选的话开机一分钟内会自动关机,与硬件内置的看门狗有关)
     Utilities -> pcat-manager

 * DM 路由监视器依赖包: https://hiwbb.com/2021/10/openwrt-netdata-show-temperature/
     *  (必选, required)
     Applications -> luci-app-netdata
因为是 usb 线刷烧写固件,实测不选上面这些软件包也能正常运行,根据实际按需选择吧。
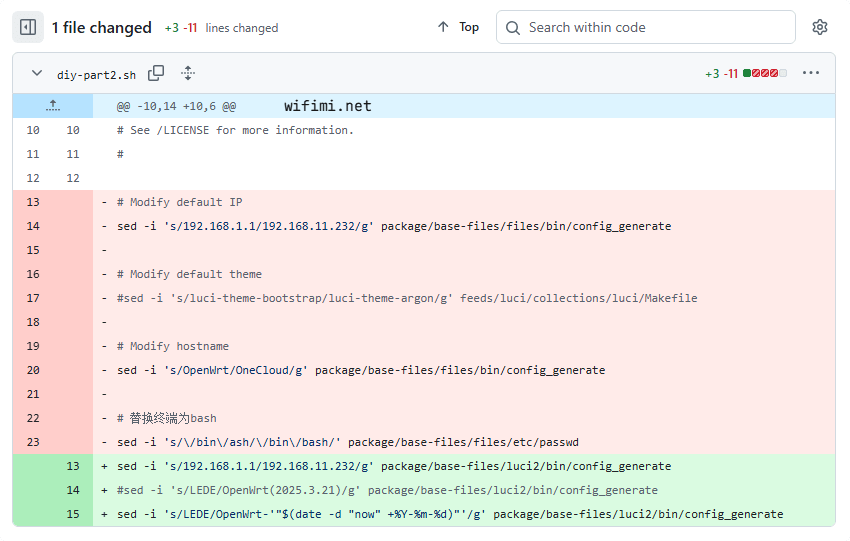
2 、按实际需要选择需要编译的插件,比如酸酸乳 Plus 配置(点击查看)等
3 、 Github Action 编译文件参考:
#
# https://github.com/P3TERX/Actions-OpenWrt
#
# File: .github/workflows/openwrt-bulder.yml
# Description: Build OpenWrt using GitHub Actions
#
# Copyright (c) 2019-2024 P3TERX <https://p3terx.com>
#
# This is free software, licensed under the MIT License.
# See /LICENSE for more information.
#

name: OpenWrt Builder(Amlogic Meson S805 boards 32 bit Thunder OneCloud)

on:
  repository_dispatch:
  workflow_dispatch:

env:
  REPO_URL: https://github.com/coolsnowwolf/lede
  REPO_BRANCH: master
  FEEDS_CONF: feeds.conf.default
  CONFIG_FILE: .config
  DIY_P1_SH: diy-part1.sh
  DIY_P2_SH: diy-part2.sh
  GEN_BURN_IMG_SH: gen_burn_img.sh
  UPLOAD_FIRMWARE: true
  UPLOAD_RELEASE: true
  TZ: Asia/Shanghai

jobs:
  build:
    runs-on: ubuntu-22.04

    steps:
    - name: "Check Server Performance"
      run: |
        echo "警告⚠"
        echo "分配的服务器性能有限,若选择的插件过多,务必注意 CPU 性能!"
        echo -e "已知 CPU 型号(降序):7763,8370C,8272CL,8171M,E5-2673 \n"
        echo "--------------------------CPU 信息--------------------------"
        echo "CPU 物理数量:$(cat /proc/cpuinfo | grep "physical id" | sort | uniq | wc -l)"
        echo -e "CPU 核心信息:$(cat /proc/cpuinfo | grep name | cut -f2 -d: | uniq -c) \n"
        echo "--------------------------内存信息--------------------------"
        echo "已安装内存详细信息:"
        echo -e "$(sudo lshw -short -C memory | grep GiB) \n"
        echo "--------------------------硬盘信息--------------------------"
        echo "硬盘数量:$(ls /dev/sd* | grep -v [1-9] | wc -l)" && df -hT

    - name: Before freeing up disk space
      run: |
        echo "Before freeing up disk space"
        echo "=============================================================================="
        df -hT
        echo "=============================================================================="

    - name: "Optimize Disk Space"
      uses: "hugoalh/[email protected]"
      with:
        operate_sudo: "True"
        general_include: ".+"
        general_exclude: |-
          ^GCC$
          ^G\+\+$
          Clang
          LLVM
        docker_include: ".+"
        docker_prune: "True"
        docker_clean: "True"
        apt_prune: "True"
        apt_clean: "True"
        homebrew_prune: "True"
        homebrew_clean: "True"
        npm_prune: "True"
        npm_clean: "True"
        os_swap: "True"

    - name: Freeing up disk space
      uses: easimon/maximize-build-space@master
      with:
        root-reserve-mb: 3072
        swap-size-mb: 1
        remove-dotnet: 'true'
        remove-android: 'true'
        remove-haskell: 'true'
        remove-codeql: 'true'
        remove-docker-images: 'true'

    - name: Free up disk space complete
      run: |
        echo "Free up disk space complete"
        echo "=============================================================================="
        df -hT
        echo "=============================================================================="

    - name: Checkout
      uses: actions/checkout@main

    - name: Initialization environment
      env:
        DEBIAN_FRONTEND: noninteractive
      run: |
        sudo rm -rf /etc/apt/sources.list.d/* /usr/share/dotnet /usr/local/lib/android /opt/ghc /opt/hostedtoolcache/CodeQL
        sudo docker image prune --all --force
        sudo sed -i 's/azure\.//' /etc/apt/sources.list
        sudo -E apt-get -qq update
        sudo -E apt-get -qq install $(cat dependson)
        sudo -E apt-get -qq autoremove --purge
        sudo -E apt-get -qq clean
        sudo timedatectl set-timezone "$TZ"
        sudo chown $USER:$GROUPS $GITHUB_WORKSPACE

    - name: Clone source code
      working-directory: ./
      run: |
        df -hT $PWD
        git clone $REPO_URL -b $REPO_BRANCH openwrt

    - name: Load custom feeds
      run: |
        [ -e $FEEDS_CONF ] && mv $FEEDS_CONF openwrt/feeds.conf.default
        chmod +x $DIY_P1_SH
        cd openwrt
        $GITHUB_WORKSPACE/$DIY_P1_SH

    - name: Update feeds
      run: cd openwrt && ./scripts/feeds update -a

    - name: Install feeds
      run: cd openwrt && ./scripts/feeds install -a

    - name: Load custom configuration
      run: |
        [ -e files ] && mv files openwrt/files
        [ -e $CONFIG_FILE ] && mv $CONFIG_FILE openwrt/.config
        chmod +x $DIY_P2_SH
        cd openwrt
        $GITHUB_WORKSPACE/$DIY_P2_SH

    - name: Download package
      id: package
      run: |
        cd openwrt
        make defconfig
        make download -j8
        find dl -size -1024c -exec ls -l {} \;
        find dl -size -1024c -exec rm -f {} \;

    - name: Compile the firmware
      id: compile
      run: |
        cd openwrt
        pwd
        df -hT $PWD
        echo -e "$(nproc) thread compile"
        make -j$(nproc) || make -j1 || make -j1 V=s
        echo "status=success" >> $GITHUB_OUTPUT
        grep '^CONFIG_TARGET.*DEVICE.*=y' .config | sed -r 's/.*DEVICE_(.*)=y/\1/' > DEVICE_NAME
        [ -s DEVICE_NAME ] && echo "DEVICE_NAME=_$(cat DEVICE_NAME)" >> $GITHUB_ENV
        echo "FILE_DATE=_$(date +"%Y%m%d%H%M")" >> $GITHUB_ENV

    - name: 生成直刷包
      if: steps.compile.outputs.status == 'success'
      run: |
        chmod +x $GEN_BURN_IMG_SH
        chmod +x AmlImg
        $GITHUB_WORKSPACE/$GEN_BURN_IMG_SH

    - name: Check space usage
      if: (!cancelled())
      run: df -hT

    - name: Organize files
      id: organize
      if: env.UPLOAD_FIRMWARE == 'true' && !cancelled()
      run: |
        cd openwrt/bin/targets/*/*
        rm -rf packages feeds.buildinfo version.buildinfo sha256sums profiles.json *.sha *.manifest
        echo "FIRMWARE=$PWD" >> $GITHUB_ENV
        echo "status=success" >> $GITHUB_OUTPUT

    - name: Upload firmware directory
      uses: actions/upload-artifact@main
      if: steps.organize.outputs.status == 'success' && !cancelled()
      with:
        name: OpenWrt_firmware${{ env.DEVICE_NAME }}${{ env.FILE_DATE }}
        path: ${{ env.FIRMWARE }}

    - name: Generate release tag
      id: tag
      if: env.UPLOAD_RELEASE == 'true' && !cancelled()
      run: |
        echo "release_tag=$(date +"%Y.%m.%d-%H%M")" >> $GITHUB_OUTPUT
        touch release.txt
        [ ${UPLOAD_GOFILE} = true && ${{ steps.gofile.outputs.url }} ] && echo "🔗 [GoFile](${{ steps.gofile.outputs.url }})" >> release.txt
        echo "status=success" >> $GITHUB_OUTPUT

    - name: Upload firmware to release
      uses: softprops/action-gh-release@master
      if: steps.tag.outputs.status == 'success' && !cancelled()
      env:
        GITHUB_TOKEN: ${{ secrets.GITHUB_TOKEN }}
      with:
        tag_name: ${{ steps.tag.outputs.release_tag }}
        body_path: release.txt
        files: ${{ env.FIRMWARE }}/*

    - name: Delete workflow runs
      uses: Mattraks/delete-workflow-runs@main
      with:
        retain_days: 0
        keep_minimum_runs: 2

    - name: Remove old Releases
      uses: dev-drprasad/delete-older-releases@master
      if: env.UPLOAD_RELEASE == 'true' && !cancelled()
      with:
        keep_latest: 3
        delete_tags: true
      env:
        GITHUB_TOKEN: ${{ secrets.GITHUB_TOKEN }}
参考 Github Action 云编译磁盘不足、编译超时问题解决方案 中 klttr 网友的 action 解决了空间不足问题。(使用公开仓库编译才会有 mnt,亲测 Private 仓库无法使用上述方法融合扩展空间……)
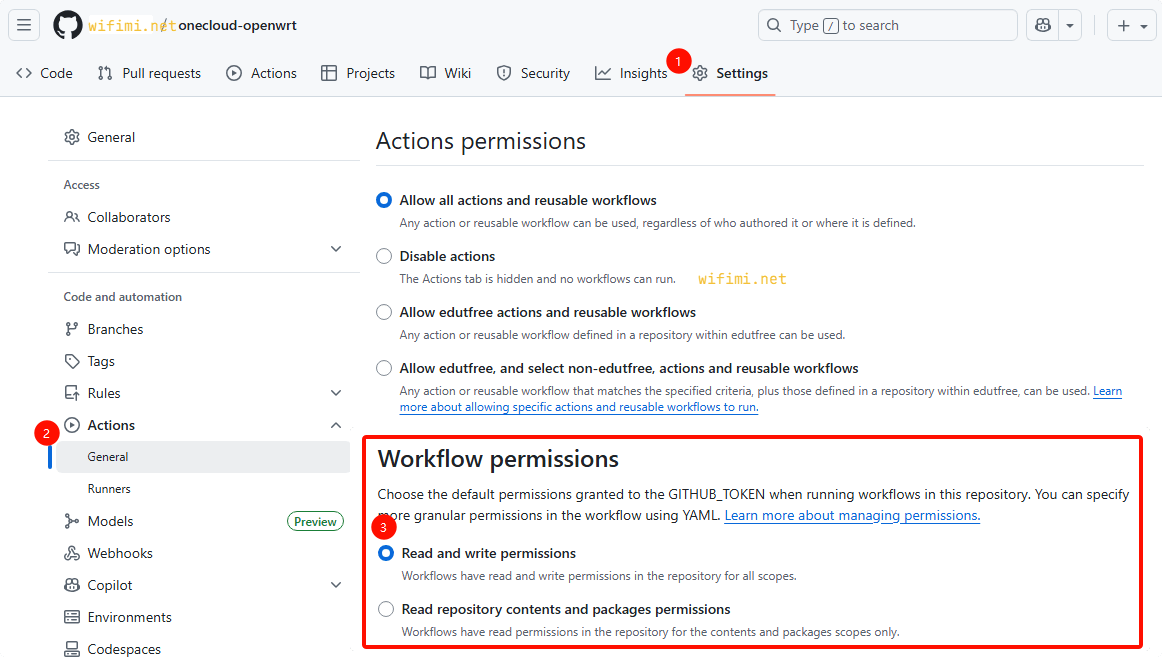
温馨提示:注意开启项目 Actions Workflow 写入权限:
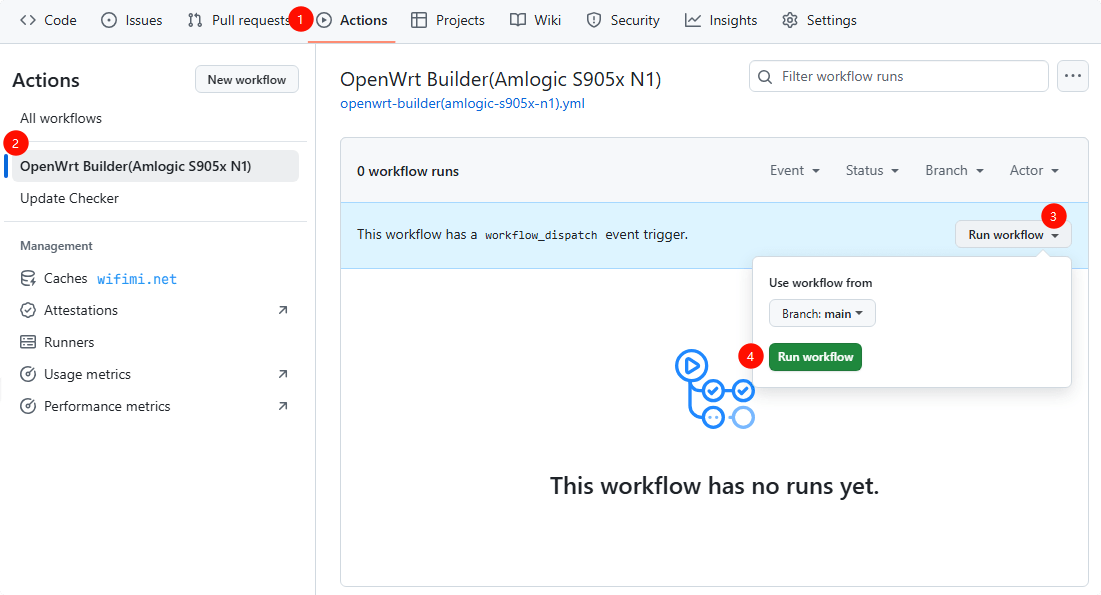
配置完成,进入 Github 相应仓库,Actions,Run workflow 开始编译即可……
OpenWRT 烧录到玩客云 eMMC
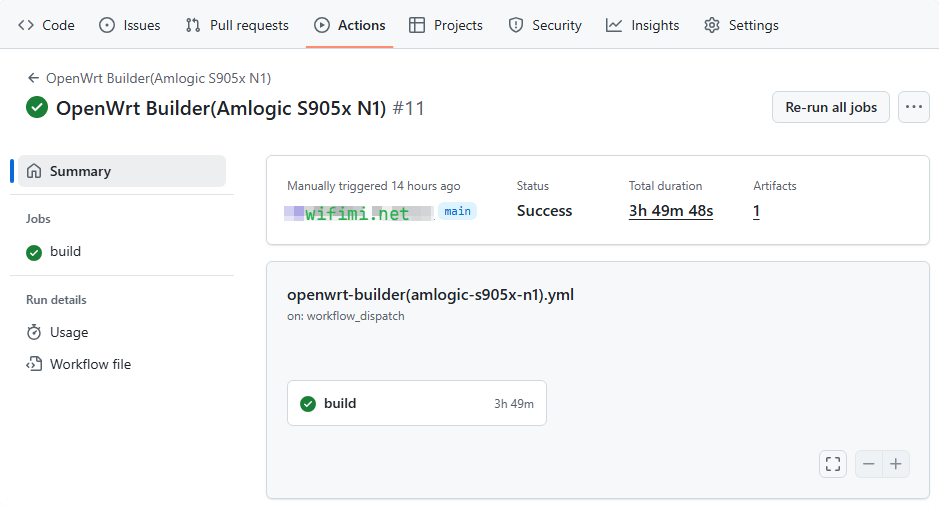
一般等上三四个小时(插件选择越多编译时间越长),Actions 编译完成,build 前有绿色勾。
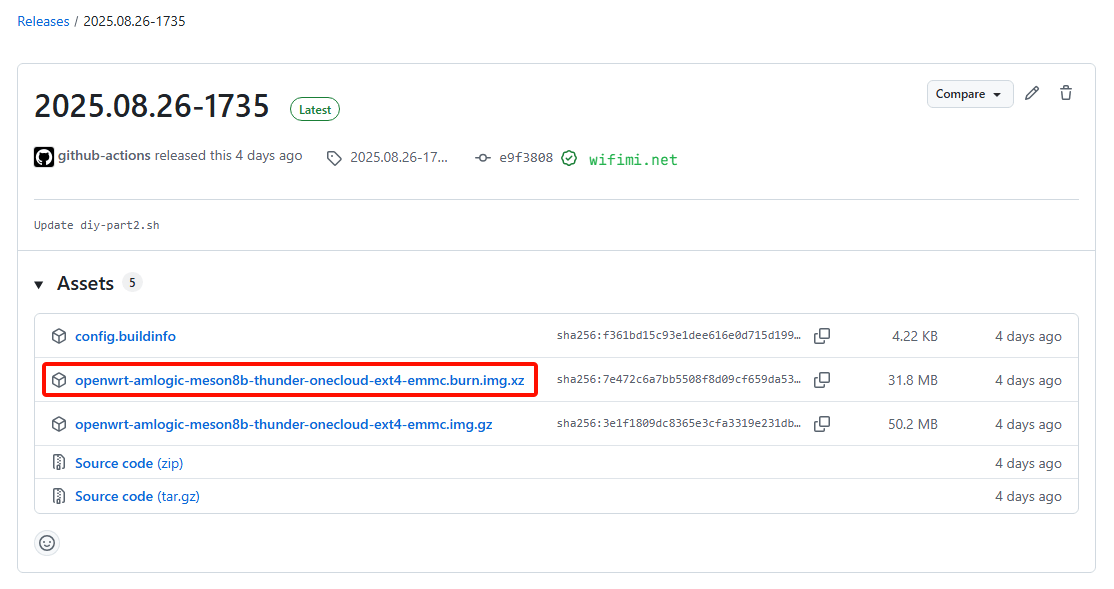
在 Github 仓库最新 releases 就能找到类似下面的文件:
openwrt-amlogic-meson8b-thunder-onecloud-ext4-emmc.burn.img.xz
openwrt-amlogic-meson8b-thunder-onecloud-ext4-emmc.img.gz
文件名包含 burn 为线刷固件,解压后使用 Amlogic_USB_Burning_Tool 通过双公头 usb 线烧录到玩客云。
Amlogic_USB_Burning_Tool 刷机教程:玩客云刷机-玩机教程
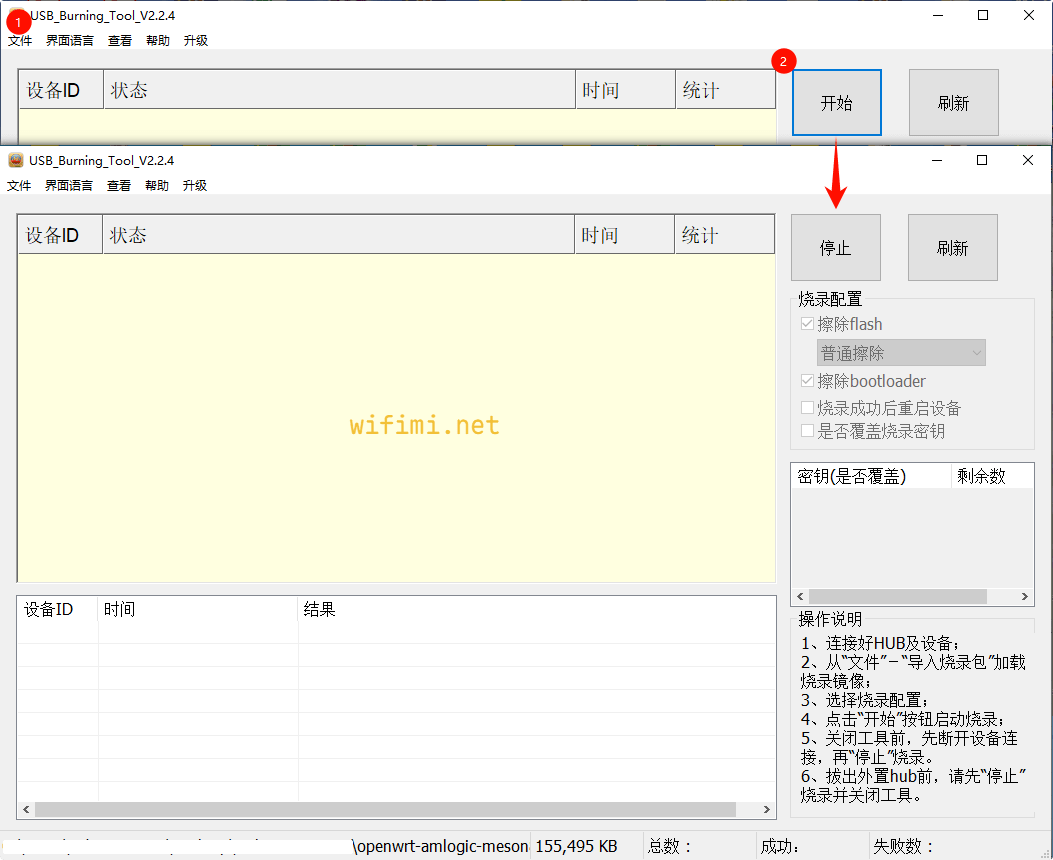
tips:如果已经刷写 openwrt 成功过,可能打开 Amlogic_USB_Burning_Tool,导入烧录的固件,点击「开始」,软件进入下图状态:
然后将玩客云使用双公头 usb 线连接好和电脑,再将玩客云通电,就能自动进入刷机状态。
如果不行再按上面的方法拆机、短接刷机……
红灯闪是在启动中,启动完成后蓝灯常亮;首次启动时间可能会长一些(五分钟左右) 。
Lean's LEDE 默认配置:
登录 ip:192.168.1.1
用户名:root
密码:password参考资料备份:onecloud-玩客云-WS1608-OpenWRT 编译烧写教程-20250826(解压密码 1024)
旁路由配置要点参考:
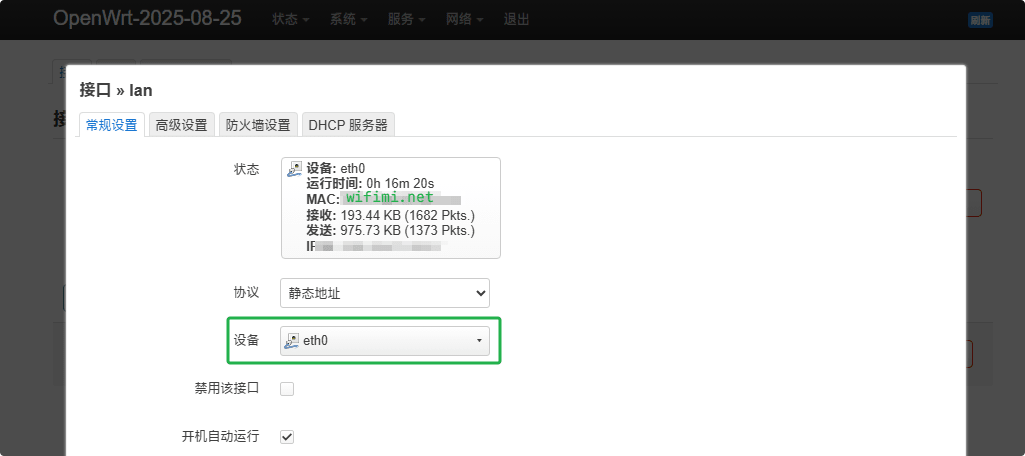
取消桥接:
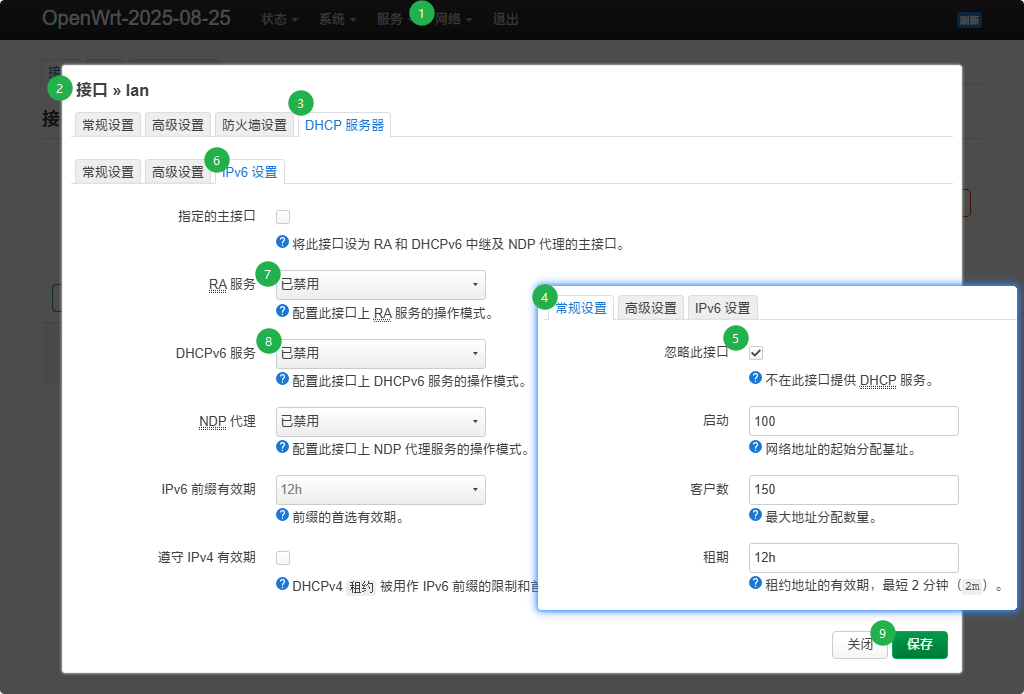
关闭 DHCP:
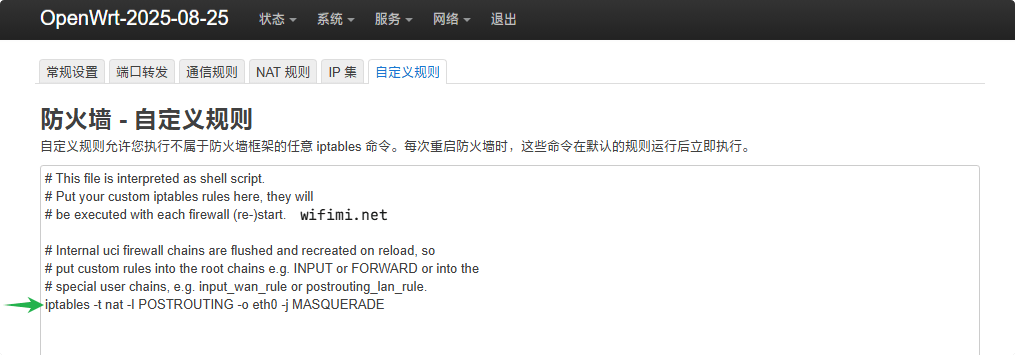
如果开启酸酸乳科学上网后国内 App 网络异常,可在「网络-- 防火墙」中加一条自定义规则:
iptables -t nat -I POSTROUTING -o eth0 -j MASQUERADE
解压密码 1024 | 任何服务均有跑路风险,请注意防范!没有啥绝对好坏!
备用节点:大哥云、万城v-city、飞机云、搬瓦工JMS、极客云、扬帆云、魔戒……
《Github编译OpenWRT-玩客云usb直刷eMMC固件》留言数:0